ACT! Synchronization Setup
Installing ACT! for Synchronization
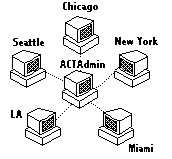
ACT Admin and Users
By Rick Shaddock, ACTHelp.com
ACT! Synchronization SetupInstalling ACT! for Synchronization
|
|
ACT! Users Guide ACTGuide.pdf Chapter 19 Synchronization. Pages 387-389
Planning Ahead - Well Begun is Half Done
ACT Folder article - Keeping It simple
Use the "Keep it Simple" folder technique, to keep things consistent.

The ACT.EXE can be in any folder, such as Program Files, or in C:\ACT.
But the following folders should be underneath the C:\ACT folder:
Each workstation would have its own ACT.EXE which reduced network traffic and speeds up performance. For those in the office working on the network, only the data files on the server would be shared, not the ACT! program. For those users away from the office, we would use synchronization to keep everyone up to date.
Edit Preferences - setting the folders to C:\ACT
At the moment, each laptop or user workstation only has the default database open, called ACTDEMO.DBF, so that we at least have one database file to open ACT! and practice with. The workstations to not yet have the master database they will be using on a daily basis.
Note Outlook 2000 has security patch which requires confirmation of sending
This is impractical for automatic synching
Download installation files for Outlook98NT.zip or Outlook98w9.zip, or use Outlook Express
Exit ACT! and go back in.
The workstations can have whichever version of Outlook you like. Or they may use other email clients. But if they have the new Outlook security patch, they will have a couple extra clicks to do when they synchronize. (See How to Synchronize)
Test the email by sending a test message to a user, and back to ACTAdmin@YourSite.com, to make sure the email system is working properly.
Note that Outlook through ACT!'s email client can be very slow. You may see the message in the bottom left "Loading message..." for many minutes before you see the message list fill in with messages. It may seem to have "hung up" but patience is a virtue, here. Luckily, you do not have to have the Outlook program open in order to synchronize using Outlook. Leave it unopened, or minimized. The synchronization will send through Outlook immediately, if this option is set with Tools, Options, Sending, Send Messages Immediately. Otherwise, you will have to open Outlook and click on Send and Receive all messages.
On the ACT Admin computer will be the master database with the most up-to-date records.
For instructional purposes, let us say that your database is called YOURDATA.DBF
In reality, it may be something like PROESA or CEPROBOL.
On each of the Users' workstations and laptops we want to have a YOURDATA.DBF
which will have only 1 record - the user's My Record.
It is suggested that you name the database the same name as ACT Admin's, to keep things
consistent.
But this database must NOT be a direct copy of the ACT Admin's database. We should not try to save time by copying the same database to the various workstations. This is a common mistake, resulting in error messsages when ACT thinks it is trying to synchronize with its own database.
If you cannot take or send this database to the user, or they already have a file, they may make or use their own My Record, with File New, and create a database with the same name of the master database, putting in themselves as the My Record. But it is preferable for the users to have a file with the same structure as the main database. It is also preferable for the ACT! Database Administrator to get everything all set up for the user, so they don't have to do very much, and possibly get it wrong.
It is important that we perform the following steps for EACH user, creating a new YOURDATA database for each user. This ensures that each database contains a unique database id. It will contain the User, and ACT Admin, all set up for them.
Let's start with the first user, for example Chris Huffman.
Select
File
Save Copy As...
Create empty copy
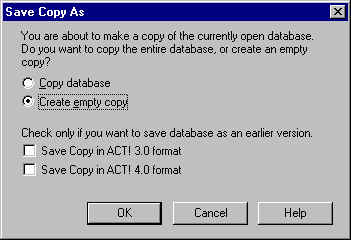
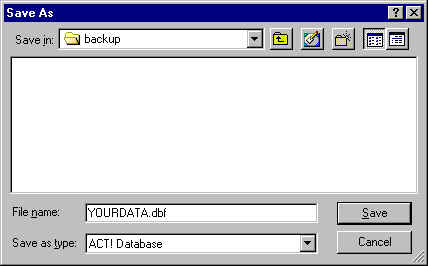
Copy this to the C:\ACT\Database\Backup folder on the server.
We are choosing a different folder than C:\ACT\DATABASE because the files are already
present there, and we do not want to overstrike them.
NOTE: If you can see the User's C:\ACT\Database folder from the server, you could put it there directly, and go to Step 4 immediately.
You will be prompted to enter the User's "My Record".
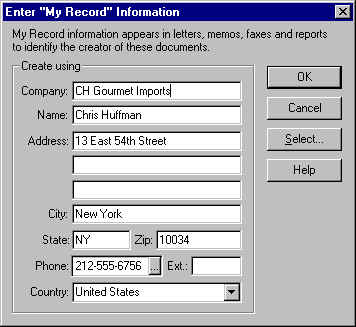
If the User already exists in the database, we don't want to create a duplicate record.
Otherwise we will be creating an "evil twin" record that will cause confusion
later.
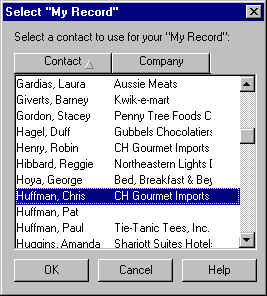
Select the Select... button, then find the existing user in the list, and select OK.
If the user does not already have a record, then go ahead and enter the information appropriate for the user of your organization.
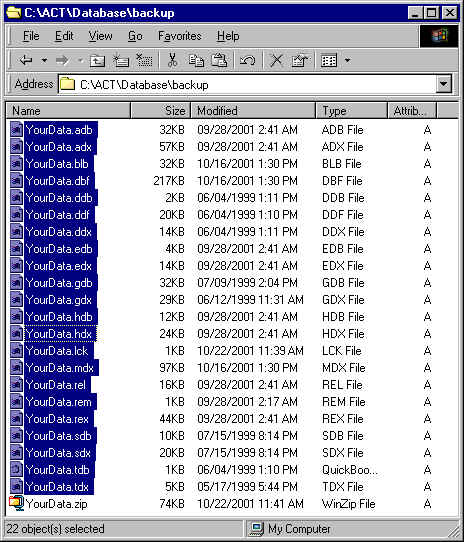
You should find the following files are automatically created. The files will
have the same "first name" and extensions as follows, using the example of the
ACT Demo database:
YOURDATA.ADB
YOURDATA.ADX
YOURDATA.BLB
YOURDATA.DBF
YOURDATA.DDB
YOURDATA.DDF
YOURDATA.DDX
YOURDATA.EDB
YOURDATA.EDX
YOURDATA.GDB
YOURDATA.GDX
YOURDATA.HDB
YOURDATA.HDX
YOURDATA.LCK
YOURDATA.MDX
YOURDATA.REL
YOURDATA.REM
YOURDATA.REX
YOURDATA.SDB
YOURDATA.SDX
YOURDATA.TDB
YOURDATA.TDX
When the .DBF file is opened by ACT!, the other files follow automatically.
Move these files to Chris Huffman's computer and put them in his C:\ACT\DATABASE folder
You can simply Cut and Paste them, using Windows Explorer, if you can see the folder, or a
folder that is shared by ACT Admin and the user.
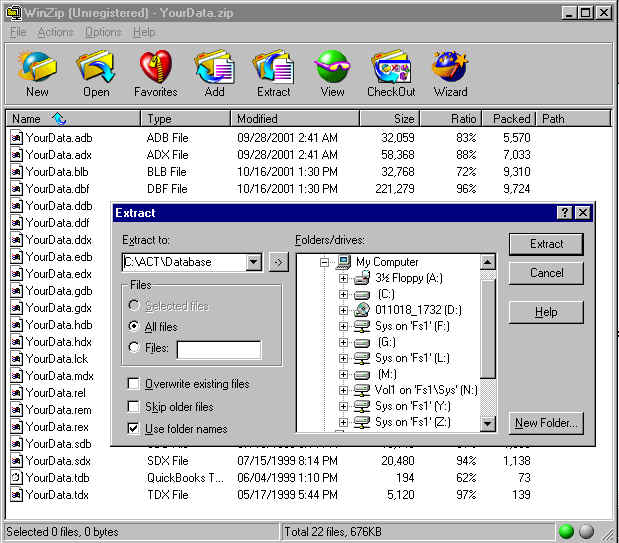
Or you can "zip" them up on to a diskette and "unzip" them on Chris
Huffman's machine.
Select the files, then right click to "Add to Zip" into a file called
"YourData.Zip"
On Joe's PC, unzip the files into his C:\ACT\Database
folder.
Open up ACT! and the YourData database. It will have just his record, and the ACT
Admin's.
Set up Joe for email, selecting Outlook as the email program. He is now prepared to receive the entire database as a synchronization file coming from ACT Admin.
Each of the one-record YourData databases will have the same name, but a unique database id, which is necessary for synchronization to work correctly.
Using the example of one ACT Admin and 3 users. This is the situation after the files have been distributed into the various C:\ACT\Database folders on the 4 computers.
| User /Login Name | Computer | My Record name | User List | Database Id (example) |
| ACTAdmin | Server | ACT Admin | ACTAdmin | J629133 |
| Chris | Chris's workstation | Chris Huffman | Chris | J629134 |
| Joe | Joe's laptop | Joe Smith | Joe | J629135 |
| Sue | Sue's laptop | Sue Jones | Sue | J629136 |
This will "push" the first changes. The first synchronization is the biggest, as it will contain all records, so it will take a longer time. Thereafter, only what has changed since the previous synchronization will be sent. But for the first time, there is no previous synchronization, so ACT! must send all records.
We now send all the records to the users from ACT Admin.
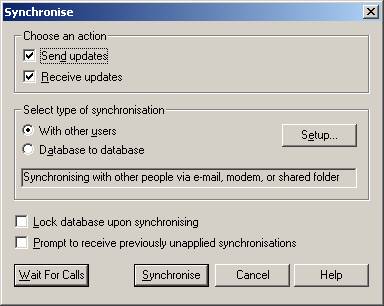
We have the user set up with a record, and the email address is filled in. Select:
File
Synchronize
Setup (see steps below for setting up users)
For this first synchronization, the ACT Admin should select to synchronize All Records. This will usually be one of the largest synchronizations to send, and it will take longer. But subsequent synchronizations will be smaller, and take less time, because they will only need to send the information that has changed since the prior synchronization.
You will see a message: "Synchronization has been set up. You can receive updates, but you cannot send updates until you set up synchronization. how do you want to proceed?"

Select "Continue without setting up"
This will accept the new synchronization file and start the process of setting up a record
for ACT Admin on the User's computer.
Before the first synchronization has been done, we are not yet ready to use the File
Synchronization command because there is only one user in the user's database - himself
(for example, Chris Huffman.)
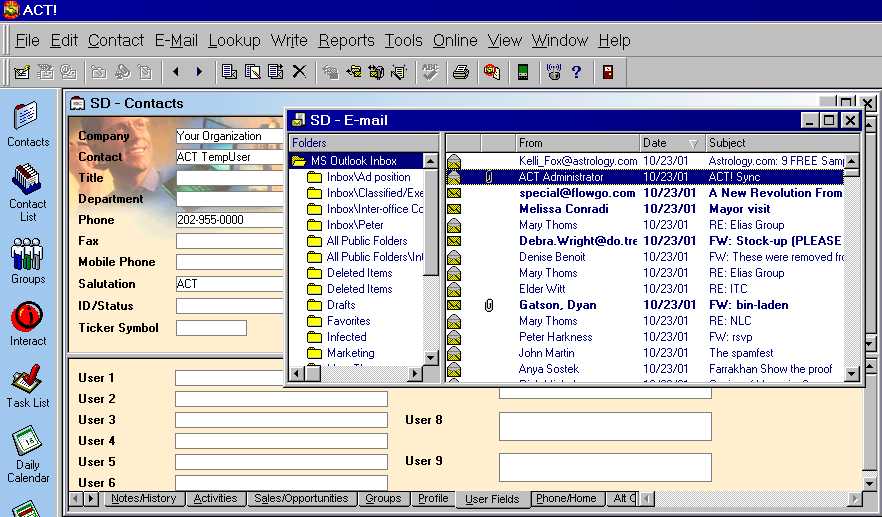
For each workstation, go in to ACT! and and View Email.
Select Email, Get/Send Email
Look for an email coming from ACTAdmin@YourPlace.com
Open the email with the Subject ACT! Sync.
Look for the attachment in the upper right hand corner and double click it.
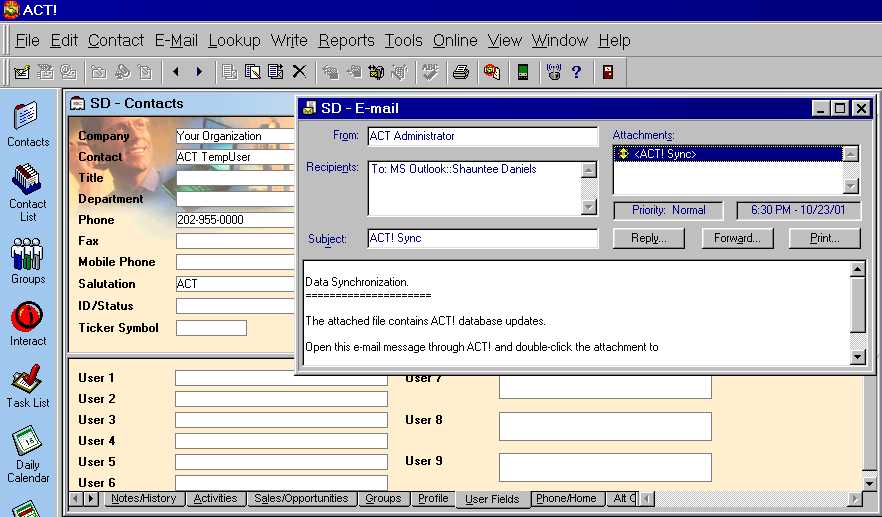
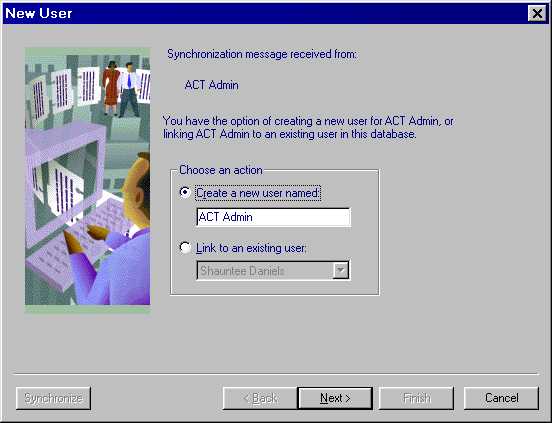
With either of the above options, it should say that a user called ACT Admin is attempting to send a synchronization files.
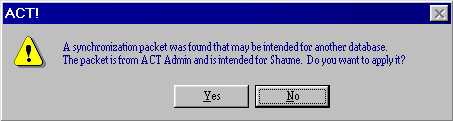
Click Yes to accept it. This also adds ACT admin to your User List
Enter the email address ACTAdmin@YourPlace.com
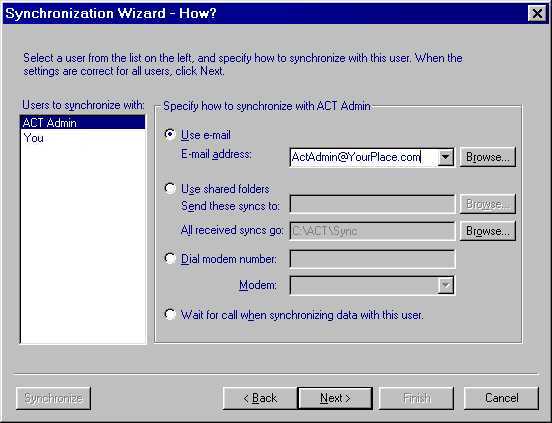
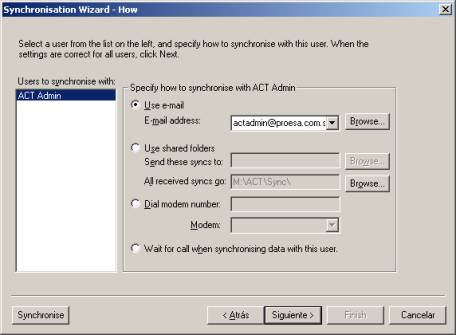
Specify how to synchronize with ACT Admin. Fill in the "ACTAdmin@YourPlace.com" email address.
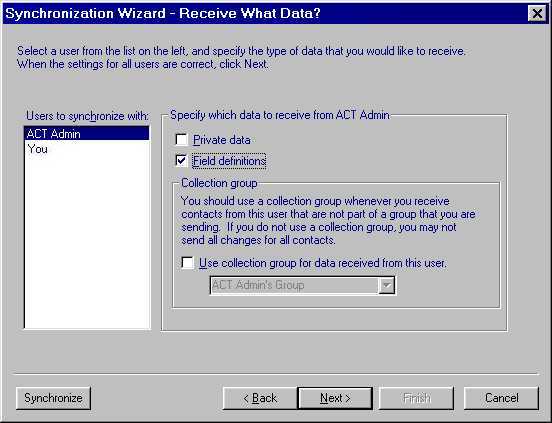
Speify which data to receive from ACT Admin
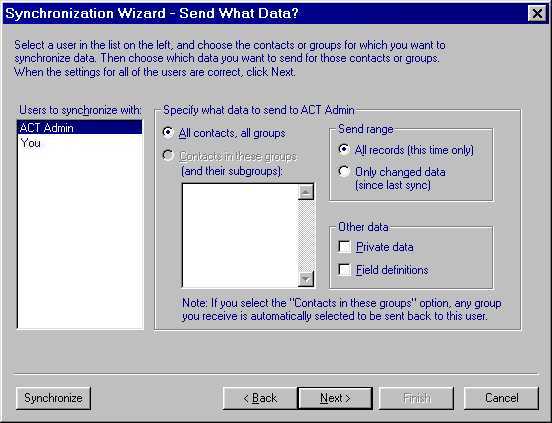
Specify what data to send to ACT Admin
Thereafter, the user will not have to check the email manually.
ACT! will automatically check the in box and process any Sync files.
Do this for each User. We now have the following situation:
| User /Login Name | Computer | My Record name | User List | Database Id (example) |
| ACTAdmin | Server | ACT Admin | ACTAdmin Chris Joe Sue |
J629133 |
| Chris | Chris's workstation | Chris Huffman | Chris ACTAdmin Joe Sue |
J629134 |
| Joe | Joe's laptop | Joe Smith | Joe ACTAdmin Chris Sue |
J629135 |
| Sue | Sue's laptop | Sue Jones | Sue ACTAdmin Chris Joe |
J629136 |
Then, test the File, Synchronize, Synchronize menu choice from the User
This will send a return sync to ACTAdmin.
Then, test the File, Synchronize, Synchronize menu choice from ACT Admin.
This will merge the changes, if any, from the User into ACT Admin.
Do this for each user's workstation or laptop.
Make a few changes, and test a few times back and forth from each workstation,
to make sure the changes are transferring correctly.
Now we can set up the File Synchronization Setup as follows:
| 1. Introduction.
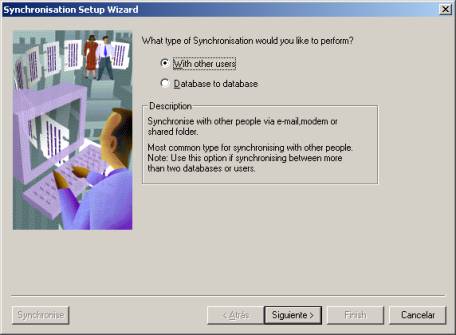
This screen is just for information. For both ACT Admin and Users, select Next 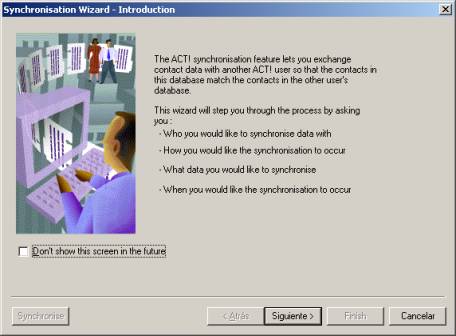 2. What type of
Synchronization? 3. What Data? Usually you want to both Send and
Receive, |
|
For ACT AdminOn the Server |
For UsersOn each Workstation or Laptop |
4. Synchronization
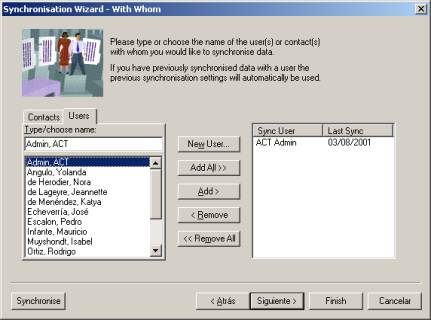
with Whom?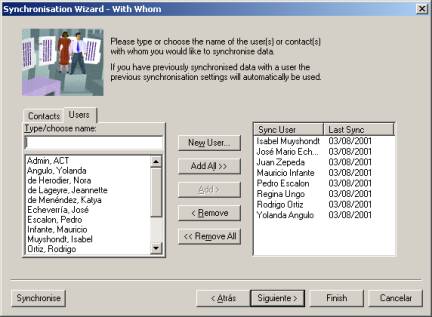 |
|
5. Set up email addresses
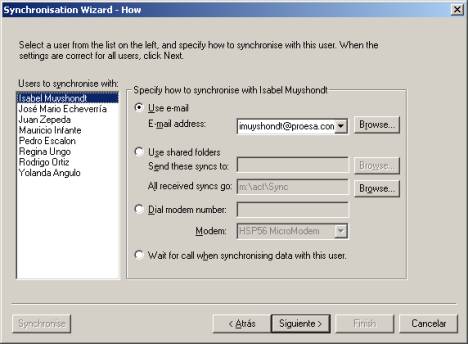 |
 |
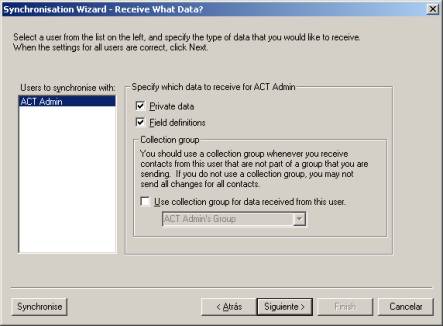
6. Receive What Data?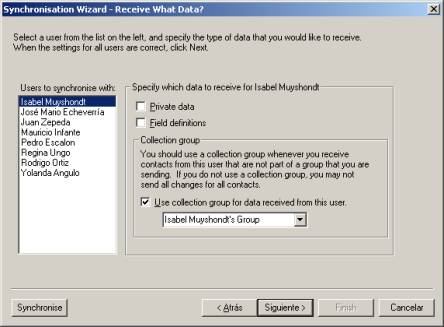 |
|
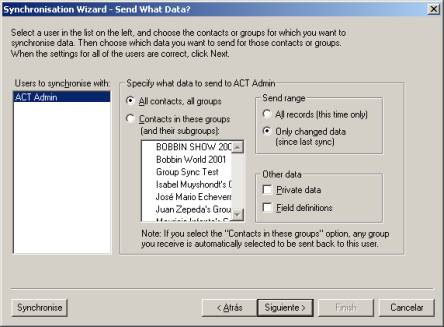
| 7. Send What Data? If this is the first time setup, select "All records (this time only)" 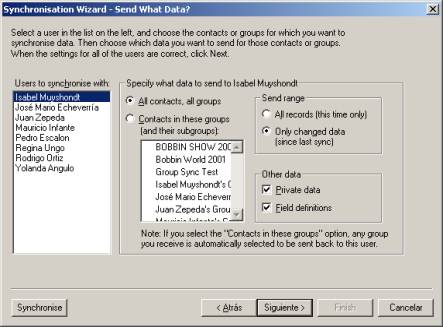 |
|
8. When to Synchronize?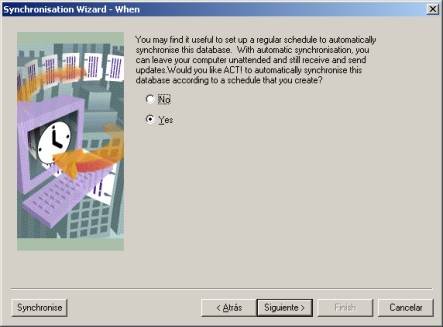 |
Users will usually synchronize daily, at their convenience. They may have their laptops off at night anyway.  |
9. Automatic times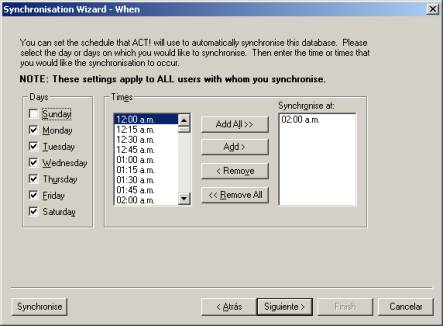 |
Not applicable |
10. Finish.
You have successfully set up synchronization.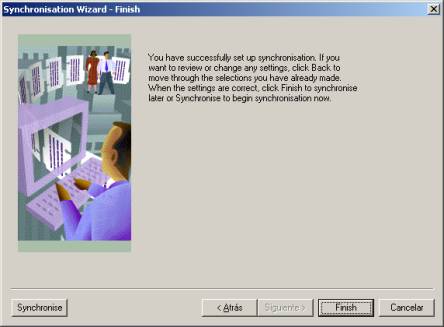 11. Synchronize |
|