If you're having a problem with your Maximizer database, the following instructions can help you get the affected file or files to CICorp for examination.
The Maximizer database, for Version 3 and later (including 97i), consists of one or more "address books" each of which is stored in a single dedicated Windows folder. Each address book consists of more than a dozen individual files. The first step in locating a problem file is to find the specific Windows folder involved; Maximizer itself will tell you this. Once you know the folder name, you can close Maximizer and use the Windows Explorer (usually available from the Start Menu) to examine the folder.
It's necessary to identify the specific file that has the problem
(sometimes more than one is involved). The Maximizer error message can help you find out,
because it always tells you what file triggered the error. Use this table to translate the
descriptive name in the error message into the filename you'll see inside the address book
folder display:
| DESCRIPTION | FILENAME |
| Accounts | MXZA.MAX |
| Address Book (main file) | MXZC.MAX |
| User Defined Fields: Data | MXZD.MAX |
| Expenses | MXZE.MAX |
| Control File | MXZF.MAX |
| Hotlist | MXZH.MAX |
| Letters and documents | MXZL.MAX |
| Macros and view layouts | MXZM.MAX |
| Notes | MXZN.MAX |
| Opportunities | MXZO.MAX |
| Appointments Calendar | MXZP.MAX |
| Opportunity Support | MXZQ.MAX |
| Selected Name (saved search lists) | MXZS.MAX |
| User Preferences | MXZU.MAX |
| Transactions | MXZTRAN.MAX |
| Strategies | MXZW.MAX |
| User Defined Fields: Definitions | MXZX.MAX |
| Strategy Links | MXZY.MAX |
| Strategy Components | MXZZ.MAX |
Not all of these files will be present in every installation, and some of them hardly ever trigger any errors. The heart of every address book is the MXZC.MAX file itself, which contains the names, addresses, and phone numbers for every entry in the book, together with an "IDentification" field that forms the connecting link to all the other files. Because this file is always in use, it's the most likely to be the culprit when an address book becomes unusable, so it forms the starting point. Once the MXZC file is repaired, other errors may become apparent, but often only this file has suffered damage.

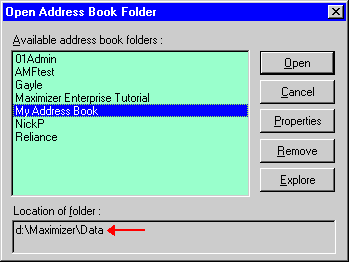
To determine the location of the folder that contains your address book, open Maximizer and pull down the "File" menu. Then select "Open address book..." or the similar action (the wording changes slightly from one version to another), and you'll see a dialog similar to this: Highlight the specific address book whose location you want to know, then look at the lower part of the dialog (the red arrow in this image) to see the drive and folder where that address book resides (in this example, that's "d:\Maximizer\Data"). Write this down and move on to the next step.
To locate the Windows folder that contains your address book, close
Maximizer and go to the Windows Start Menu. There, locate the Windows Explorer choice and
select it. Use the left-hand pane of the Explorer window to navigate to the appropriate
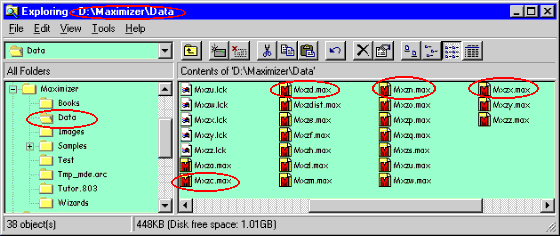
folder. Select the folder in the left-hand pane (indicated by the red oval in the image)
and the files within that folder will appear in the right-hand pane.
 In this example, red ovals indicate
those files most often involved in data error situations. You may not see the
".max" type flags on the filenames, but the files you want will have a red M in
their icons. The ".lck" files also in this folder don't contain any data;
they're used only by the data manager engine to control shared access by multiple users.
Once you've located the file (or files) involved in your error situation,
the next step is to pack them together into a compressed package that you can attach to an
Email message. While many compression utilities are available, this example shows the use
of the shareware utility WinZip (for a link to its web site, see the http://cicorp.com/data/fix page here). When you
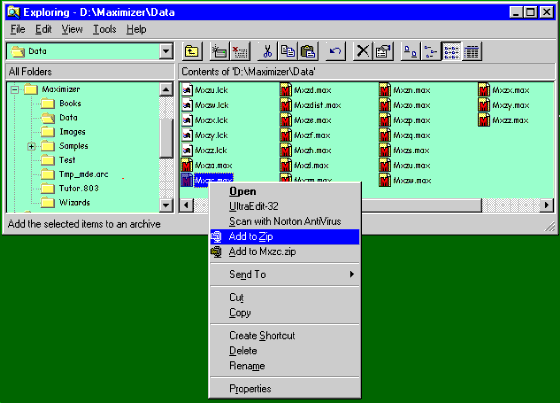
install WinZip and tell it to add itself to the "context menu", you can then
just right-click on a file in the Explorer right-hand pane as shown here:
 One of the options in the resulting
menu is "Add to Zip" (highlighted). Choosing this one brings up WinZip, all
ready to copy the selected file into a new or existing compressed file. Your context menu
won't look exactly like this one, unless you've installed the same set of utilities, but
the WinZip lines will be in approximately the same locations. See the WinZip help file
itself for detailed instructions on using the utility; in general, the suggested options
that come up automatically will be adequate for this purpose and all you'll have to add
will be a filename to assign to the compressed file. It's best to use your own name for
this, to prevent confusion in CICorp's mailbox (which often contains half a dozen or more
files bearing variations on the name "MXZC.ZIP")!
The final step of the process is to send the compressed file to CICorp. If you have an FTP program and are comfortable with its use, you can use it to send the file to "Repair@CICorp.com" and it will get to the same destination. Expect the transfer to take about 4 minutes per megabyte.